Hyper-V Server: Installing, configuring and troubleshooting
It’s been a few weeks since its release but I finally managed to put my hands on to Hyper-V Server.
I was very curious about it: A free operating system released by Microsoft working only as an HyperVisor it makes wonder about a lot of things. Also recently I’ve been working with VMWare ESX Server 3i, that is also the hypervisor working directly on the machine, and I had a good experience (I really loved the monitoring and reporting features that you can use).
From the moment I started using Hyper-V Server few troubleshooting tasks needed to be done.
Installing Hyper-V Server
If you ever installed any operating system, ever, you should not have any problem with this. You’ll of course see that the process is identical from Vista and Windows 2008.

To get started with Hyper-V Server there’s available the Hyper-V Server 2008 Configuration Guide.
If you want to avoid almost any command line to be executed from now on, Hyper-V Server has a simple tool where you’ll load a menu to access most of the configurations you will need. You can access it using this cmd:
C:windowssystem32hvconfig.cmd

But I’ll execute the next steps using the command line features, so this procedure will apply as well for Windows 2008 Server Core.
Managing Remotely
To start using Hyper-V Server you will need Hyper-V Console on your Vista SP1 (remember: there’s no other option for an Hyper-V Server to be managed remotely), it is the same console to manage remotely any other Windows 2008 with Hyper-V. If you don’t have it yet, you can download it from here:
Windows Vista Service Pack 1 Management Tools update for the release version of Hyper-V
But, from this moment I started to have a few problems.
1. Solving “Access denied. Unable to establish communication between: <Hyper-V Server> and <Vista client>”

For all of those who were using the early versions of this remote console probably had the same error.
The solution is the same, so I want to reference this post from John Howard’s blog; where it explain almost everything you must know about configuring Hyper-V role on a Windows 2008 Core Server. Hyper-V Server works the same way as this Core version of Windows 2008, so every step of configuration will apply.
Here’s a quick summary of the steps involved, I’m only applying the steps I considered necessary for my environment.
1. Since I’m using a domain environment, I joined this machine to the domain using NETDOM utility:
netdom join <ComputerName> /domain:<DomainName> /userd:<UserName> /passwordd:*
/passwordd: * Requires user password to be entered.
Reboot the machine to apply the changes:
shutdown /t 0 /r
2. Adding necessary rules on the Firewall to allow remote connections.
a. Remote Management:
netsh advfirewall firewall set rule group=”Remote Administration” new enable=yes

Note: You can also use netsh to change server’s IP, using the following syntax:
netsh interface ip set address “<Adapter Name>” static ipaddr subnetmask gateway metric.
b. Enable Remote Desktop
cscript windowssystem32scregedit.wsf /ar 0
cscript windowssystem32scregedit.wsf /cs 0
c. Reboot the machine to apply the changes:
shutdown /t 0 /r
3. Solving the “Access denied” error from the client:
Now that the server is properly configured for remote management, you have to run a simple procedure to fix this common error:
a. On “Run” insert “DCOMCNFG“. Click OK
b. Expand “Component Services“, expand “Computers“. Right click on “My Computer” and click on “Properties” (imagen)
c. Now click on “COM Security”
d. In “Access Permission” click “Edit Limits”
e. Select “ANONYMOUS LOGON” in “Group or User Name“. In the column “Allow“, set the “Permissions for User” with “Remote Access“.

Now you should be able to connect remotely using the Hyper-V console.
Since I finally completed the Hyper-V Server configurations for remote management, so the obvious next step is creating a new virtual machine.
I started with a dummy virtual machine, just for testing. But in the last step of the virtual machine creation wizard I got “The virtual machine could not be started because the hypervisor is not running.” Ouch!
2. Solving “The virtual machine could not be started because the hypervisor is not running”
You should not worry if you see this error. There’s a good chance that your hardware is not the problem and that the hypervisor feature on your processor it is running.
Even though that the hardware on your server supports Hyper-V and that the service is correctly installed, what happens is that the hypervisor was not added on the boot environment and the service was not started.
To solve this, you only need to run this command line:
BCDEdit /set hypervisorlaunchtype auto

Ok, NOW you can start using Hyper-V Server.
Adding Features to Hyper-V Server
Don’t get all excited, as we mentioned before, this is just an HyperVisor and you should not expect that much functionality available.
Most of the features (not roles) that you can install are there to increase security and to achieve interoperability with other platforms like System Center Virtual Machine Manager or Data Protection Manager, supporting Live Backup (backing up virtual machine without downtime) as well.
To access all features available, as in Server Core, from cmd:
oclist
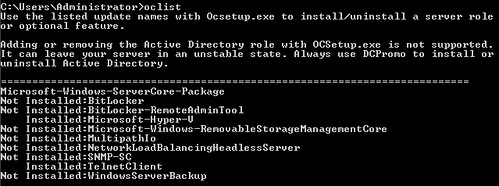
To install one of the features use: start /w ocsetup <NameofService> (for instance, I installed on this Hyper-V Server the TelnetClient)
You’ll find as well that Hyper-V Server includes a WMI interface for remote management extensibility. Here you can find more information:
Hope you find it useful.
Cheers!
Categories: Hyper-V, Virtualization, Windows Server 2008


I read your posts for a long time and should tell you that your articles always prove to be of a high value and quality for readers.
For those who are getting this error “the virtual machine could not be started because the hypervisor is not running” while running Virtual Machines on their Windows Server 2008 OR 2008 R2, follow the instruction given here
http://www.computers.nepalesemap.com/index.php?topic=1554.0
It helped solve my problem with Hyper-V; hope it helps you too